Install & configure LEMP Stack for developing and deploying web applications. This guide will assist you to install Nginx, MySQL, and PHP on Ubuntu 18.04.
Overview
In this guide, we will install Nginx, MySQL, and PHP (LEMP Stack) for the development and deploying web applications. We will also configure a web server to server PHP application on Ubuntu Server 18.04. We will cover the following sections in this tutorial.
Prerequisites
Before installing software, you should meet the following requirements.
- Server with Ubuntu operating system
- Non-root user with sudo privileges
What is LEMP Stack?
LEMP stack is a collection of software that can be used to run PHP-based web applications. LEMP stands for Linux, Nginx, MySQL, and PHP. The LEMP stack is a variant of the LAMP stack. Both LAMP and LEMP are popular software stacks for developing and deploying web applications. There is one difference between these two software stacks. LAMP makes use of the Apache web server, whereas LEMP server makes use of the Nginx web server.
LEMP Installation
In this section, we will focus on how to install Nginx, MySQL, and PHP on Ubuntu 18.04. First of all, we need to update server packages by running the below command.
$ sudo apt update
Installing Nginx Web Server
- Run the command below to install Nginx on Ubuntu.
$ sudo apt install nginx
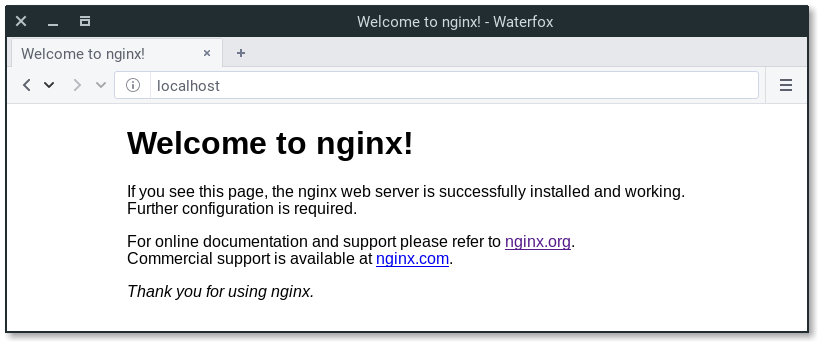
- Once you done with the Nginx installation, open your web browser and type your server IP address. It will show you the Nginx web server default welcome page.
Installing MySQL
Now, you need to install MySQL database server for the management of your application data.
- Run the command below to install MySQL on Ubuntu.
$ sudo apt install mysql-server
- To secure MySQL installation, run the following command.
$ sudo mysql_secure_installation
- You will be asked either you want to enable VALIDATE PASSWORD PLUGIN or not. It’s better not to enable it so, type N and press enter to move on next step.
- Next, it will ask you couple of questions as shown below. You need to answer all the questions.
Enter current password for root (enter for none):
Set root password? [Y/n]: N
Remove anonymous users? [Y/n]: Y
Disallow root login remotely? [Y/n]: Y
Remove test database and access to it? [Y/n]:  Y
Reload privilege tables now? [Y/n]:  Y
- Now, MySQL server is up and running. You can test it with the following command. Enter your Ubuntu root account password, not the MySQL one in case it prompted for a password.
$ sudo mysql
- Enter the command below to exit from MySQL.
mysql> exit
Installing PHP
We will cover installation of php-fpm for the processing of PHP. php-fpm stands for fastCGI process manager. Nginx web server does not have any builtin functionality for the processing of PHP so, we will use php-fpm for it. In addition, we will install php-mysql for communicating PHP with the MySQL for data management.
- Run the command below to install PHP on Ubuntu.
$ sudo apt install php-fpm php-mysql
- Now, you are done with the PHP installation and all the required software of LEMP Stack to run web application.
- In this step, we will create Nginx configuration file in order to tell Nginx to use the PHP processor for dynamic content. Run the command below to create Nginx config file.
$ sudo nano /etc/nginx/sites-available/example.com
- Copy the code into the Nginx config file and save it.
server {
        listen 80;
        root /var/www/html;
        index index.php index.html index.htm index.nginx-debian.html;
        server_name example.com;

        location / {
                try_files $uri $uri/ =404;
        }

        location ~ \.php$ {
                include snippets/fastcgi-php.conf;
                fastcgi_pass unix:/var/run/php/php7.2-fpm.sock;
        }

        location ~ /\.ht {
                deny all;
        }
}
Let’s take a short look on these directives and location block, so you can have basic information.
- listen: You can define the port for Nginx. Use port 80 for HTTP and 443 for HTTPS protocols.
- root: Define the root directory for your project. Nginx will use it to serve the website or web application.
- index: Define the order in which files should be served. When the index file is called, Nginx will deliver the index.php file.
- server_name: Define domain name or public IP of your server.
- location /: This location block has try_block directive and matches the requested URI. Nginx returns 404 error, if it does not find the requested file.
- location ~ .php$: This location block handles the PHP processing.
- location ~ /.ht: Nginx does not process .htaccess file and this location blocks deal with it. Nginx does not serve .htaccess file by defining deny all directive.
Create symlink for the newly created Nginx config file to enable it.
$ sudo ln -s /etc/nginx/sites-available/example.com /etc/nginx/sites-enabled/
- Run the following command to test Nginx config file for syntax errors.
$ sudo nginx -t
- Restart Nginx web server.
$ sudo systemctl restart nginx
Test PHP
- In order to ensure that Nginx correctly serves the PHP pages, we will create PHP file for testing the configurations.
- Create info.php file in the root directory of Nginx web server by running the below command.
$ sudo nano /var/www/html/info.php
- Add the below code into it and save the file.
<?php
phpinfo();
- Open your web browser and type domain name or server public IP followed by php file name like http://SERVER_IP_OR_DOMAIN/info.php. You will see the below page.

Conclusion
In this tutorial, we discussed about how to install and configure the LEMP stack. As you can see, configuring software stack components is really easy. In addition, you can start creating and serving web apps in minutes.
Finally, containerize.com is in a consistent process of writing blog posts on further latest open source products. Therefore, stay in touch with this Web Server Solution Stack category for the latest updates.
Explore
You may find the following links relevant:
- Best Open Source Web Server Solution Stack
- Most Popular Open Source Digital Forensic Tools
- Top 5 Open Source Message Queue (MQ) Software In 2021
- Best Open Source Cloud Storage and File Sharing Software
- How To Install and Secure phpMyAdmin with Nginx on Ubuntu
- How to Install Multiple PHP Versions with Nginx on Ubuntu
- Top 5 Most Popular OSI-Approved Open Source Licenses Of 2021