Nextcloud is self-hosted open source files synchronization and collaboration software. This tutorial will show how to install NextCloud with Apache on Ubuntu.
Overview
Nextcloud is a free and secure self-hosted cloud storage solution written in PHP programming language. It provides data access using web interface and functionally similar to Dropbox. Proprietary cloud storage solutions like Dropbox and Google Drive are convenient but they can be used to collect personal data because your files are stored on their systems. If you need safe, secure and compliant file synchronization and sharing solution then you can switch to open source NextCloud server. NextCloud setup can be installed on your private home servers or on a virtual private server.
Nextcloud open source provides end-to-end encryption, means files can be encrypted on client device before uploaded to the server. It can also be integrated with an online office suite like Collobora, OnlyOffice nextcloud so you can create and edit your doc, ppt, xls files directly from NextCloud client. You can share and synchronize one or more files and folders on your computer with your Nextcloud server after nextcloud client download. Nextcloud desktop download and mobile clients provide options to sync and share across all devices under your control. Place data files in your local shared directories, and those files are immediately synchronized to the server and to other devices using the Nextcloud Desktop Sync Client, iOS app or android devices.
This tutorial will help you to install Nextcloud on Ubuntu 20.04 LTS Linux operating system with Apache.
- Install Prerequisites (LAMP Stack)
- Download Nextcloud Archive on Ubuntu
- Create MySQL Database
- Run Nextcloud Web Installer
- Wrapping Up
Step 1: Install Prerequisites (LAMP Stack)
The first thing for installing nextcloud on ubuntu is that you must have running LAMP server on your Ubuntu LTS system. Log into your system and access terminal window. If you already have running LAMP stack skip this step else use the following commands to install the necessary dependencies.
Install PHP
Let’s start with the installation of PHP version 5.6 or higher version on your Ubuntu server:
sudo apt-get update
sudo apt-get install -y php php-gd php-curl php-zip php-xml php-mbstring
You can verify the PHP version using the following command:
php -v
Install Apache2
Next, install Apache with the command:
sudo apt-get install -y apache2 libapache2-mod-php
sudo systemctl restart apache2
Install MySQL
With the dependencies out of the way, the next step to be taken care of is securing the mysql database server. Install MySQL database server by running:
sudo apt-get install -y mysql-server php-mysql
Step 2: Download Nextcloud Archive on Ubuntu
At the time of writing this article, Nextcloud latest version is 22.0.0beta5. After successfully configuring lamp server on your system, Let’s download Nextcloud from its official website.
cd /tmp
wget https://download.nextcloud.com/server/releases/nextcloud-22.0.0beta5.zip
Once the nextcloud server download is completed, extract downloaded archive under website document root and set up the ownership of the nextcloud directory to www-data on files and directories.
cd /var/www/html
sudo unzip /tmp/nextcloud-22.0.0beta5.zip
sudo chown -R www-data:www-data nextcloud
sudo chmod -R 755 nextcloud
Now, remove the downloaded archive file.
sudo rm -f /tmp/nextcloud-22.0.0beta5.zip
Step 3: Create MySQL Database
After extracting source code, let’s create a Nextcloud MySQL database and user account for configuring Nextcloud. Use the following set of command to log in to MySQL server, create nextcloud database, user and exit from the MySQL console.
mysql -u root -p
Enter password:
mysql> CREATE DATABASE nextcloud;
mysql> GRANT ALL ON nextcloud.* to 'nextcloud'@'localhost' IDENTIFIED BY 'Yasir_Pa$$w0rd_';
mysql> FLUSH PRIVILEGES;
mysql> quit
Step 4: Run Nextcloud Web Installer
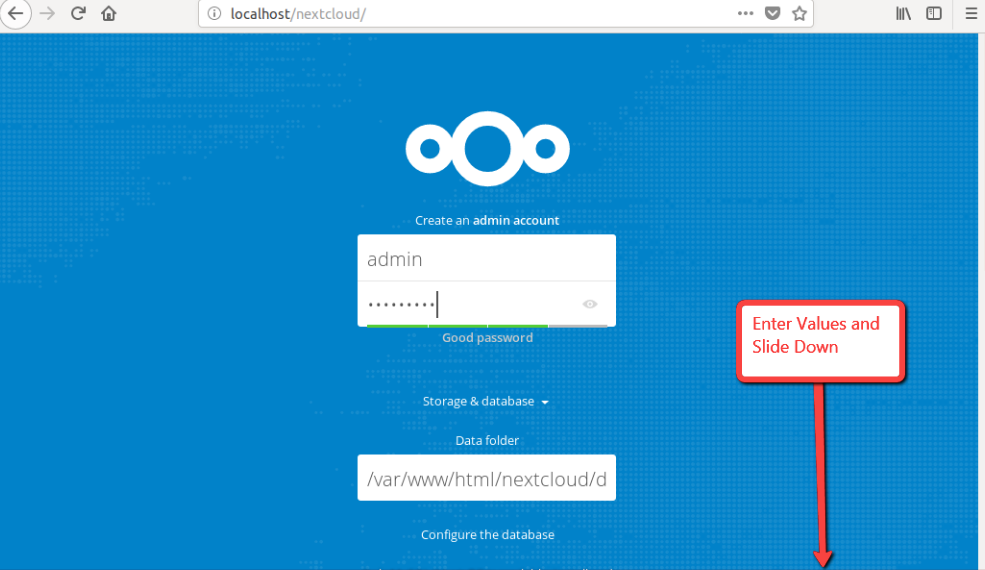
At this point, Nextcloud install ubuntu 20.04 successfully and configured. Now, open the Nextcloud configuration directory in the web browser like below and type the URL http://your-domain.com . Change localhost to your server IP address or domain name. You will see the following screen:
http://localhost/nextcloud/ or http://your_domain_name/nextcloud/
Enter new admin credentials to create an admin account and provide the location of the data folder.
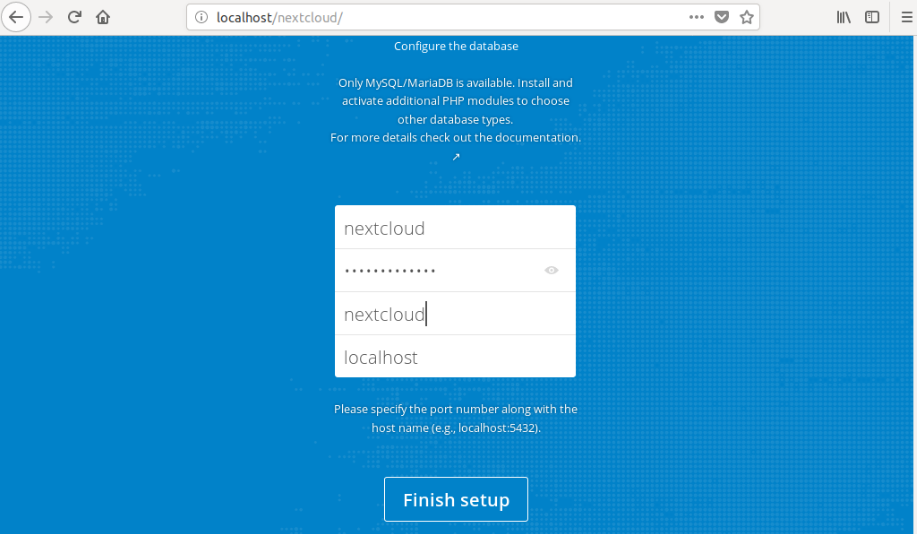
Now slide your page down and input the database name, database username, password and click on Finish Setup button.
Once the installation has been finished, you should see the Nextcloud admin dashboard in the following screen. Here you can create a user, groups, assign them permissions, etc.
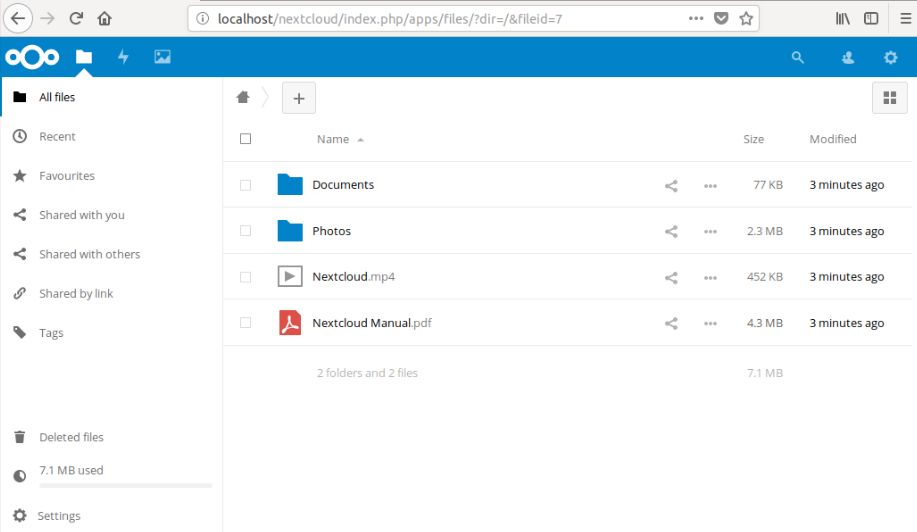
Congratulations, You have a working Nextcloud on-premise cloud solution on your Ubuntu LTS system. You can now start customizing your cloud server to perfectly meet your needs.
Wrapping Up:
Congratulations! You have successfully configured and installed Nextcloud on Ubuntu server with Apache. You have learnt how to create a private cloud. Nextcloud ubuntu server is an amazing cloud storage collaboration platform that can serve just about anyone’s private or hybrid cloud storage needs. Now you know how to install nextcloud on ubuntu and your data is safe and secure in your self-hosted cloud . In our upcoming tutorials, we’ll discuss about more interesting topics related to web server solution stacks.
What cloud based self-hosted storage solution do you prefer?. If you have any questions, please get in touch.
Explore:
You may like following articles relating to the day-to-day management of your server.
- How to Install and Configure ownCloud with Apache on Ubuntu
- How To Configure Apache as a Reverse Proxy For Ubuntu or Debian
- Install and Secure phpMyAdmin with Nginx on Ubuntu
- Secure and Encrypt Nginx with Let’s Encrypt on Ubuntu 20.04
- Configure HTTP/2 Support in Nginx On Ubuntu/Debian
- Setup Nginx With Passenger on AWS Production Server